How to Setup Voicemail to Ticket for Kaseya
- Log into the 1stream Admin Portal.
- Go to the Administration > Manage Organization menu in the top right.

- Scroll down to the Connected Account and CRM Settings section.
- Click on the Kaseya BMS text. The Modify ConnectWise Connection Settings pop-up will appear.
- Scroll down to the Client VoiceMail Extensions To Tickets section.

- Click on the green circled + to open the configuration pop-up. The Add New Client Voice Mail Extensions to Tickets pop-up will appear.
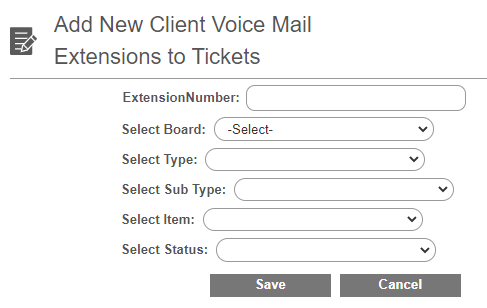
- In the Extension Number field, input the desired extension number that will receive the voicemails that should be pushed to ticket.
- In the Select Board drop-down, select the desired board that the voicemails should be sent over to.
- In the Select Type drop-down, select the desired type that should apply to the voicemail ticket.
- In the Select Sub Type drop-down, selected the desired sub type that should apply to the voicemail ticket, if applicable.
- In the Select Item drop-down, select the desired item that should apply to the voicemail ticket, if applicable.
- In the Select Status drop-down, select the desired status that should apply to the voice mails ticket.
- Click the Save button.
- At the bottom of the Kaseya Connection Settings window, select the Catch All Company that should be used for any tickets that can't be matched to a contact.

- Save the CRM Settings
Catch All Warning
If you fail to set a Catch All Company, then voicemails which cannot be matched to a contact will not create tickets. Ensure you set this to a valid company which allows for saving in your CRM/PSA, and test to make sure you can receive a ticket from an internal extension call for instance.
Once done, any voicemails received for the assigned extension will produce a ticket with the voicemail file and transcription as an attachment. It does take a few minutes for the voicemail to be transcribed and the ticket to be created.